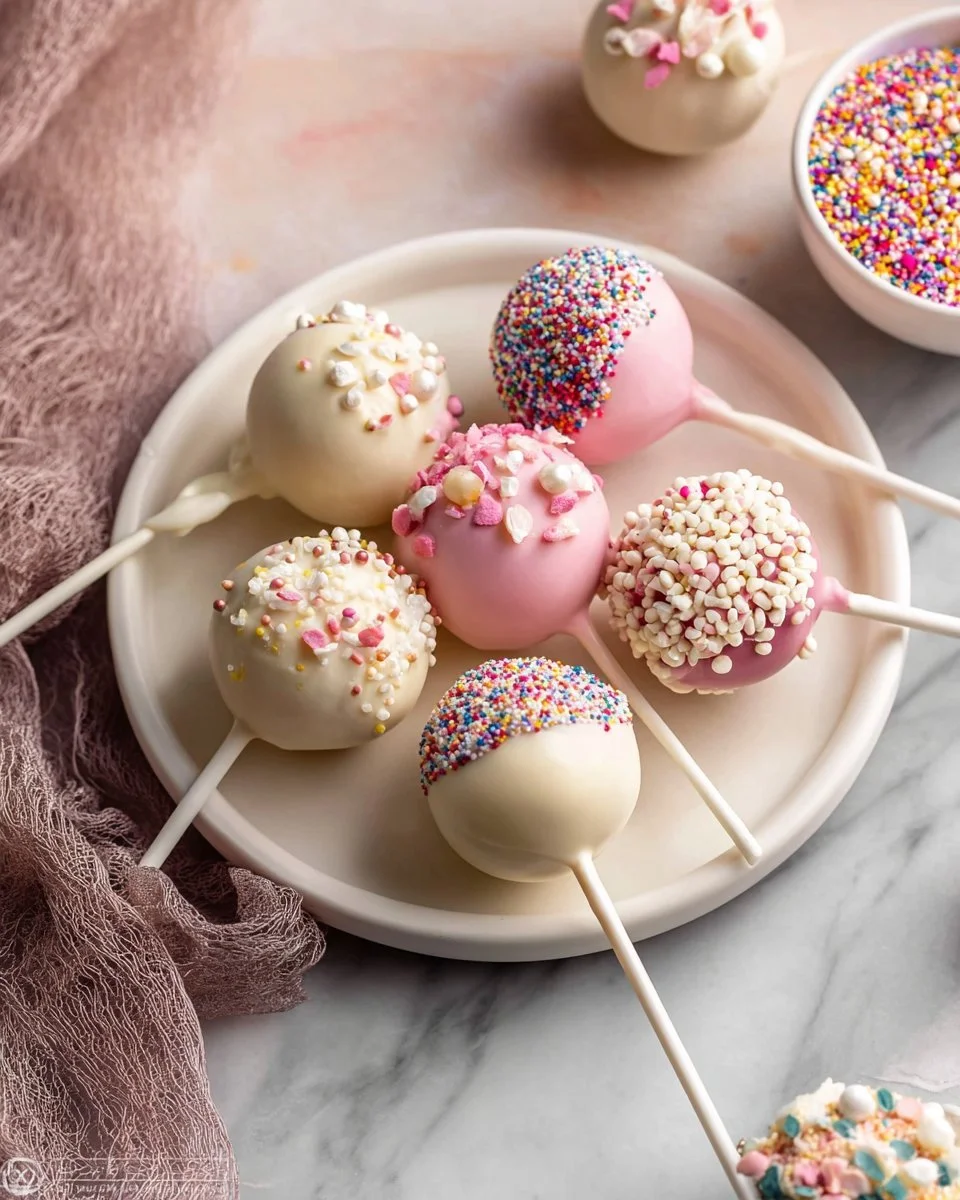
Cake Pops
Warm, bite sized, and pure joy on a stick, these Cake Pops turn leftover or freshly baked cake into a playful treat everyone will love. The interior is tender, moist, and cake like with a creamy, buttery frosting folded into the crumbs to hold each pop together. The exterior, when coated in melted candy melts or white chocolate, becomes crisp and glossy, and the sprinkles add that festive crunch and color. Aromas of vanilla and butter fill the kitchen as you bake the cake and prepare the frosting, making this recipe perfect for parties, school events, birthday celebrations, or anytime you want a portable dessert with old fashioned charm. If you enjoy trying different small desserts, you might also like this 3-Ingredient Apple Cake, which shares simple ingredient swaps and easy technique that translate well to cake pops.
Ingredients
-
1 and 2/3 cups all-purpose flour
Provides the structure for the cake base. Measure evenly for consistent texture. -
1/2 teaspoon baking powder
A leavening agent that helps the cake rise and stay tender. -
1/4 teaspoon baking soda
Works with acidic elements to add lift and lightness. -
1/2 teaspoon salt
Enhances the overall flavor and balances sweetness. -
1/2 cup unsalted butter, softened
Adds richness and helps create a tender crumb in the cake. -
1 cup granulated sugar
Sweetens the cake and contributes to browning. -
1 large egg
Binds the batter and adds moisture and structure. -
2 teaspoons pure vanilla extract
Provides warm, aromatic flavor throughout the cake. -
1 cup whole milk (or buttermilk)
Adds moisture and helps create a soft, tender cake. You can substitute buttermilk for a slightly tangier result. -
7 tablespoons unsalted butter, softened (for frosting)
The base of a simple buttercream that holds cake crumbs together. -
1 and 3/4 cups confectioners’ sugar (for frosting)
Sweetens and stabilizes the frosting for binding the crumbs. -
2–3 teaspoons heavy cream or whole milk (for frosting)
Adjusts frosting consistency for a light and fluffy texture. -
1 teaspoon pure vanilla extract (for frosting)
Adds depth and a sweet vanilla note to the frosting. -
24 ounces candy melts (or white chocolate bars, for coating)
Melts into a smooth coating to encase each pop and allow decoration. -
Sprinkles (for decoration)
Adds color, texture, and a festive finish to the coated pops.
For inspiration on citrusy cake textures that translate well to small desserts, see this lemon cake variation.
Step-by-step Instructions
-
Preheat and prepare the pan. Preheat the oven to 350°F (177°C) and grease a 9-inch springform pan. Greasing ensures the cake releases cleanly.
-
Combine dry ingredients. Whisk together the flour, baking powder, baking soda, and salt in a medium bowl until evenly mixed.
-
Cream butter and sugar. In a large bowl, cream together the softened butter and granulated sugar for about 3 minutes until light and fluffy. This traps air for a tender cake.
-
Add egg and vanilla. Add the egg and 2 teaspoons pure vanilla extract, mixing until just combined and smooth.
-
Alternate dry ingredients and milk. Add the dry ingredients and the milk to the butter mixture in alternating additions, beginning and ending with the dry ingredients. Mix until just combined to avoid overmixing.
-
Bake the cake. Pour the batter into the prepared pan and bake for 30 to 36 minutes or until a toothpick inserted in the center comes out clean. Ovens vary, so start checking at 30 minutes.
-
Cool completely. Allow the cake to cool completely in the pan or on a wire rack before proceeding. Cooling prevents excess moisture when crumbling.
-
Make the frosting. For the frosting, cream the 7 tablespoons softened butter, then mix in the confectioners’ sugar, 2 to 3 teaspoons heavy cream or whole milk, and 1 teaspoon pure vanilla extract until light and fluffy.
-
Crumble and combine. Crumble the cooled cake into a large bowl and add spoonfuls of the frosting. Mix until the crumbs hold together when pressed into a ball.
-
Shape and chill. Roll the mixture into even balls and place them on a lined tray. Refrigerate for 2 hours to firm up. Chilling makes dipping easier and reduces breakage.
-
Melt and coat. Melt the candy melts or white chocolate bars according to package directions. Dip the chilled balls on lollipop sticks, then coat fully in the melted candy and decorate with sprinkles while the coating is still wet. Work quickly so the coating sets smooth.
-
Set before serving. Allow the coated pops to set completely at room temperature or in the fridge before serving. This ensures the shell hardens for a clean bite.
For tips on baking times and how different pans affect texture, you can reference this guide on baking differences here.
Recipe Details
- Prep Time: 45 minutes active, plus 2 hours chilling
- Cook Time: 30 to 36 minutes
- Total Time: Approximately 3 hours 15 minutes including cooling and refrigeration
- Servings: About 24 cake pops
- Calories: Approximately 320 calories per cake pop
Tips, Storage & Variations
-
Tips
- Use a cookie scoop or small ice cream scoop to portion uniform balls for even coating and presentation.
- If the mixture is too sticky, chill it another 15 to 30 minutes before rolling.
- Warm the candy melts in 15 to 20 second intervals and stir to avoid seizing.
-
Storage
- Store cake pops in an airtight container at room temperature for up to 2 days. Keep them out of direct heat or sunlight to prevent melting.
- For longer storage, keep them in the refrigerator for up to 1 week. Let chilled pops sit for 10 to 15 minutes at room temperature before serving for best flavor.
-
Freezing
- Freeze uncoated rolled cake balls on a tray until firm, then transfer to a freezer bag for up to 2 months. Thaw in the fridge before dipping.
- Coated pops can be frozen on a tray and then wrapped individually for up to 1 month. Thaw in the fridge.
-
Variations using ingredients on hand
- Buttermilk version: Use buttermilk instead of whole milk for a slightly tangy crumb.
- Extra vanilla: Increase vanilla in the frosting for a more pronounced aroma.
- White chocolate or candy melt options: Use white chocolate bars or different colored candy melts to change appearance while keeping the same method. For another compact dessert idea, check this lava cake option air fryer lava cake guide.

FAQ
Q: How long will cake pops stay moist?
A: Properly stored cake pops remain moist for about 2 to 7 days depending on storage method. Refrigerate for up to 1 week.
Q: Can I use leftover cake instead of baking a new one?
A: Yes, leftover cake works well. Crumble it and follow the same frosting binding step.
Q: Why did my coating crack or separate?
A: Rapid temperature changes or thin coatings can crack. Make sure cake balls are chilled and use a properly tempered coating.
Q: Can I skip refrigerating the rolled balls?
A: Chilling is highly recommended. It firms the balls and reduces breakage during dipping.
Q: How do I get a smooth coating?
A: Dip quickly, tap off excess gently, and rotate the stick while coating sets to smooth the surface.
Q: Can I make mini cake pops with this recipe?
A: Yes, portion smaller balls and adjust chilling time accordingly.
People Also Ask
-
What size cake pan is best for cake pops?
A 9-inch springform pan as used here gives an even bake and a good crumb for crumbling into pops. -
How do I make the cake mixture less sticky?
Chill the combined cake and frosting mixture for 15 to 30 minutes before rolling into balls. -
Are candy melts better than white chocolate?
Candy melts are formulated to set hard and are often easier to work with. White chocolate can be used but may need tempering. -
How do I keep cake pops from falling off the stick?
Dip the tip of the stick into melted coating before inserting slightly into the chilled ball, then dip after the coating sets a little. -
Can I bake the cake ahead of time?
Yes, bake the cake a day ahead, wrap it well, and crumble it when you are ready to make the pops. -
How long should I refrigerate before dipping?
Refrigerate rolled balls for at least 2 hours to ensure they are firm enough for dipping.
Conclusion
I hope these Cake Pops bring a little celebration to your day. They combine a tender, buttery cake interior with a smooth, sweet coating and playful sprinkles, making them ideal for gatherings or a fun baking project. For step by step technique ideas and variations you can consult this helpful guide from Homemade Cake Pops – Sally’s Baking Addiction, and for additional flavor inspiration see How To Make Cake Pops (Any Flavor!) – Preppy Kitchen. If you make these, please share how they turned out and any decoration ideas you loved. Enjoy baking and sharing these sweet little treats.