
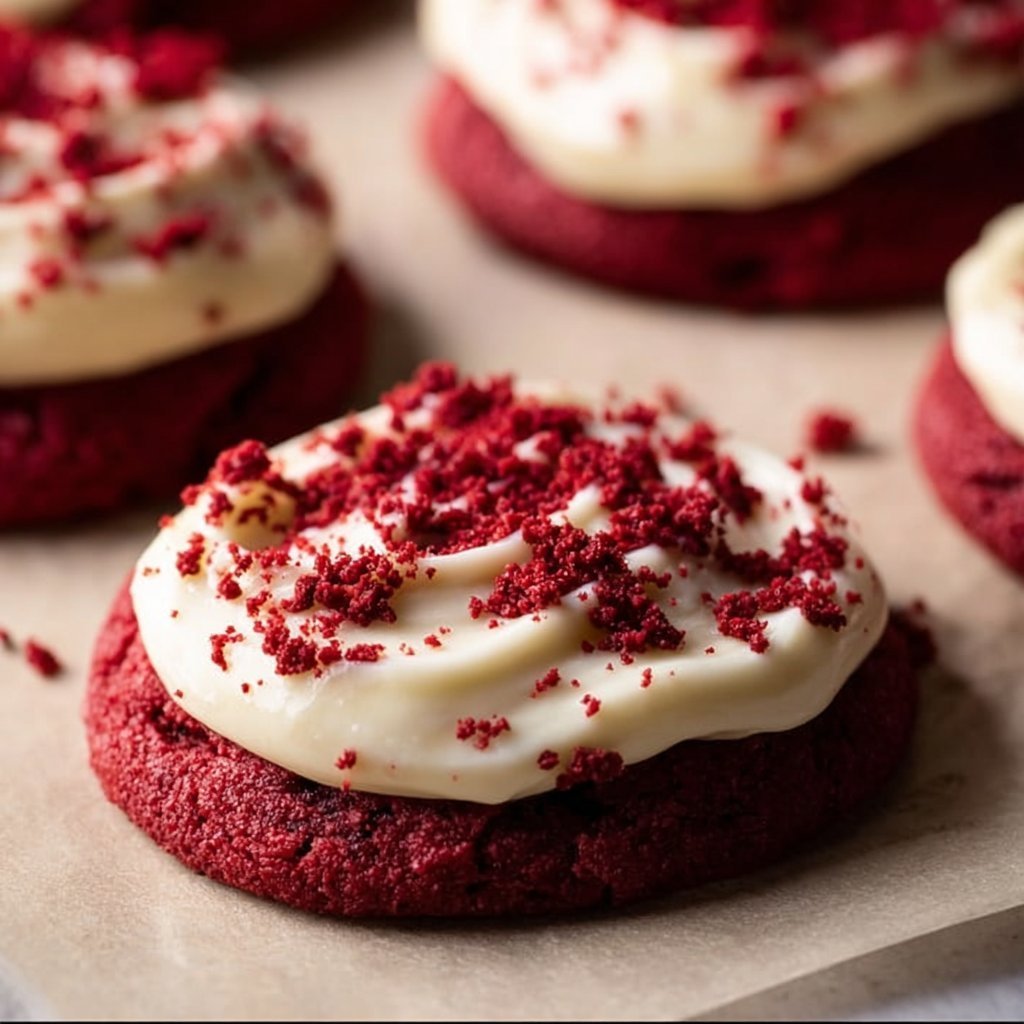
Frosted Red Velvet Cupcake Cookies
Red velvet cake is a staple dessert beloved for its decadent flavor and striking color. Elevating this classic treat into delightful cookie form, these Frosted Red Velvet Cupcake Cookies bring together a soft and chewy texture, rich cocoa undertones, and the tangy sweetness of cream cheese frosting. The aromatic scent of vanilla and cocoa fills your kitchen as they bake, instantly evoking feelings of warmth and nostalgia.
Perfect for celebrations, potlucks, or simply indulging yourself at home, these cookies are mesmerizing in their vibrant red hue and irresistible in taste. Each bite offers a satisfying softness, complemented by a luscious cream cheese frosting that adds a truly indulgent touch. Let’s dive into this scrumptious recipe that will surely become a favorite among family and friends!
Ingredients
- 1 & 1/2 cups all-purpose flour: The base for structure, providing a perfect chewy texture.
- 1/4 cup unsweetened cocoa powder: Adds rich chocolate flavor without sweetness.
- 1 tablespoon instant milk powder: Enhances creaminess and flavor depth.
- 1 tablespoon cornstarch: Helps create tender cookies with a melt-in-your-mouth quality.
- 1/2 teaspoon baking powder: Gives cookies their initial lift during baking.
- 1/4 teaspoon baking soda: Works alongside the baking powder for added rise and fluffiness.
- 1/4 teaspoon salt: Balances sweetness and enhances overall flavor.
- 1/2 cup unsalted butter, softened: Provides richness and moisture.
- 3 tablespoons vegetable oil: Ensures a tender texture and helps keep cookies moist.
- 1/2 cup packed brown sugar: Adds moisture and a hint of caramel flavor.
- 1/2 cup granulated sugar: Sweetens and balances the richness of the other ingredients.
- 1 large egg: Binds the ingredients together and helps with leavening.
- 1 teaspoon pure vanilla extract: Adds warm, sweet flavor to the cookies.
- 1 teaspoon white vinegar: Enhances the red color and adds a slight tang.
- 1 to 2 teaspoons red liquid-gel food coloring: Imparts the iconic red hue to the cookies.
- 3 ounces cream cheese: The star ingredient in the frosting, contributing creaminess and tang.
- 6 tablespoons unsalted butter, softened: Provides a rich base for an ultra-creamy frosting.
- 1 teaspoon pure vanilla extract: Adds a warm flavor to the frosting.
- 1 & 1/2 cups powdered sugar: Sweetens the frosting and gives it an airy texture.
Step-by-Step Instructions
-
In a medium bowl, whisk together the all-purpose flour, cocoa powder, milk powder, cornstarch, baking powder, baking soda, and salt. Set this dry mixture aside.
-
In a large bowl, mix the softened butter, vegetable oil, brown sugar, and granulated sugar until the mixture is smooth and creamy.
-
Whisk in the egg and vanilla extract. Add the white vinegar and food coloring, stirring until you achieve your desired red color.
-
Gradually fold the dry mixture into the wet mixture until a thick dough forms. Make sure not to overmix; just combine until there are no dry spots.
-
Use a large cookie scoop to portion out the dough onto parchment-lined baking sheets, spacing them appropriately for spreading.
-
Bake in a preheated oven at 350°F (175°C) for 12-15 minutes, or until the cookies are puffed and the edges are lightly golden brown.
-
Let the cookies cool on the baking sheets for about 5 minutes before transferring them to a wire rack to cool completely.
-
To prepare the frosting, cream together the cream cheese and softened butter in a bowl. Add the vanilla extract, then incorporate the powdered sugar until the mixture is smooth and fluffy.
-
Pipe or spread the cream cheese frosting generously onto the cooled cookies.
-
If desired, sprinkle any cookie crumbles over the frosting for additional texture and flair.
Recipe Details
- Prep Time: 20 minutes
- Cook Time: 12-15 minutes
- Total Time: 35-40 minutes
- Servings: 12 cookies
- Calories: Approximately 190 calories per cookie
Tips, Storage & Variations
- Cooking Tip: Do not overmix the dough to ensure a soft cookie texture. Just mix until combined.
- Storage: Store cookies in an airtight container at room temperature for up to 5 days.
- Freezing: These cookies freeze well. Place unfrosted cookies in a freezer-safe container for up to 2 months. Frosting can be made fresh when ready to serve.
- Flavor Variations: For a different twist, add a pinch of cinnamon to the cookie dough or try using lemon zest in the frosting for a refreshing citrus note.
FAQ Section
1. Can I use a different type of frosting?
Yes, feel free to experiment with chocolate or vanilla buttercream for a different flavor.
2. Do I need to chill the dough?
Chilling the dough is not necessary, but it can make the cookies slightly thicker.
3. Can I use cake flour instead of all-purpose flour?
Yes, using cake flour will result in a lighter and softer cookie.
4. How can I adjust the red color intensity?
Add more or less food coloring until you achieve the desired shade.
5. Are these cookies suitable for parties?
Absolutely! Their unique color and flavor make them a festive treat for gatherings.
6. Can I make these cookies gluten-free?
You can substitute the all-purpose flour with a 1:1 gluten-free flour blend.
People Also Ask (PAA) Expansion
1. What is the origin of red velvet cake?
Red velvet cake originated in the United States and became popular in the 1920s.
2. How do I know when my cookies are done?
Look for puffed cookies with lightly golden edges; the centers will remain soft.
3. Can I add chocolate chips to the cookies?
Yes, chocolate chips can add a delightful texture and flavor contrast.
4. How should I store the frosted cookies?
Store in an airtight container in the refrigerator for about 3-5 days.
5. What type of food coloring is best?
Gel food coloring is recommended for vibrant color without altering the dough’s consistency.
6. Can I make mini cookies?
Yes, adjust the baking time down to about 10 minutes for smaller cookies.
Conclusion
These Frosted Red Velvet Cupcake Cookies are a perfect blend of flavor, color, and texture that will charm everyone who tries them. They are not just cookies, but a fun treat you can share on special occasions or enjoy as an everyday delight. We hope you try this recipe and find joy in baking and sharing these delightful cookies with friends and family. Enjoy every bite and the smiles they bring!