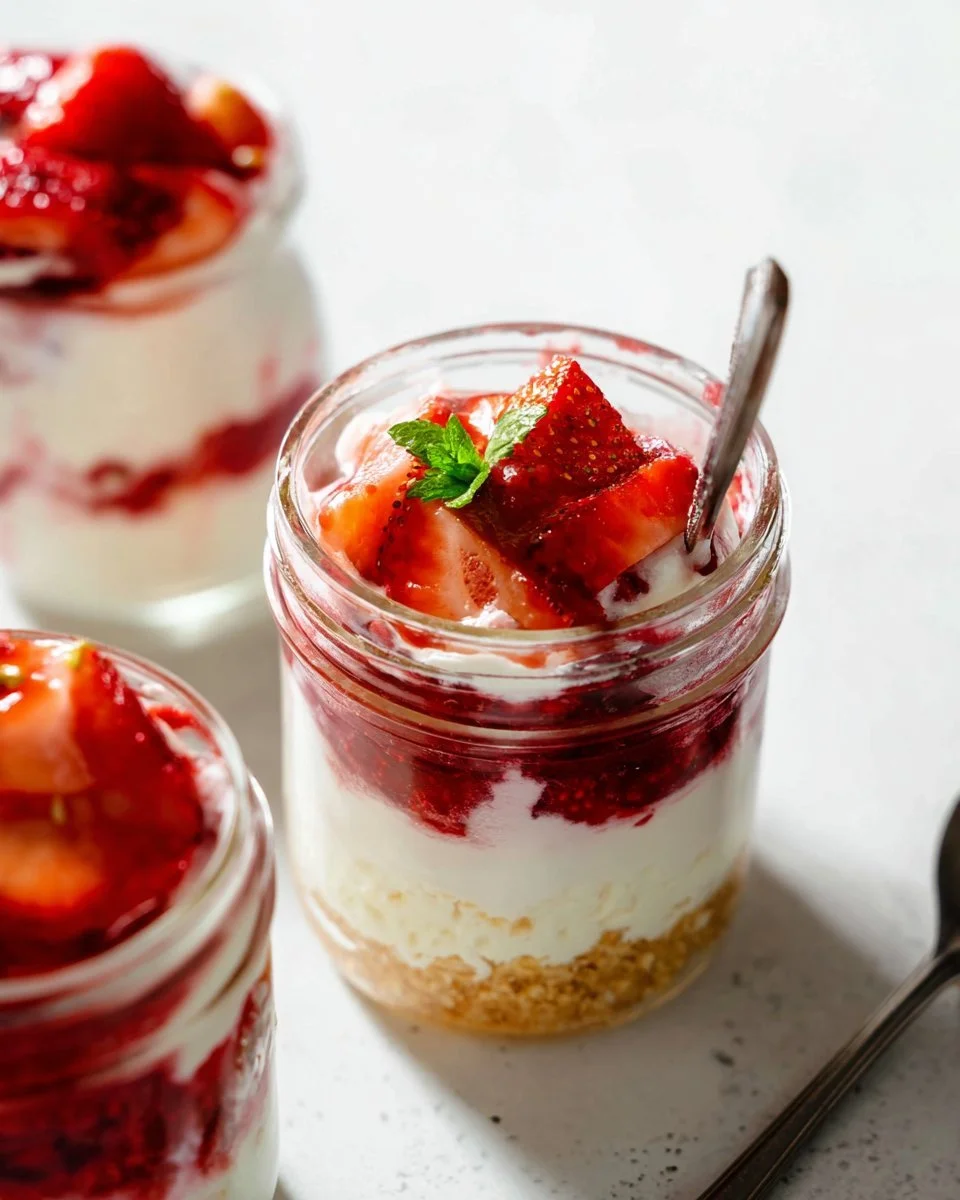
Cheesecake Jars
Warm, creamy, and endlessly charming, these Cheesecake Jars are a no-fuss way to serve classic cheesecake in a portable, make-ahead package. Each jar layers a buttery graham crust with a silky, tangy cream cheese filling that is lightened with whipped cream for an airy, mousse-like texture. The aroma is simple and inviting, a soft mix of vanilla and lemon that complements bright fruit or rich chocolate toppings. These jars are ideal for casual dinner parties, potlucks, picnic desserts, or when you want an elegant single-serve treat without slicing a whole cake. If you enjoy compact desserts, you might also like this take on caramel and cheesecake flavors in a bar format that pairs well with seasonal fruit. Try a caramel apple cheesecake bar recipe for another easy make-ahead option.
Ingredients
- 2 Tablespoons unsalted butter, melted — Adds richness and helps bind the graham cracker crust so it holds together in the jar.
- 1 cup graham cracker crumbs — Provides the classic crunchy base; use finely crushed crumbs for a smoother crust.
- 1 cup heavy cream, cold — Whips into stiff peaks to lighten the filling and give it a mousse-like texture.
- 8 ounces full-fat brick cream cheese, softened — The creamy, tangy base of the cheesecake filling; brick-style gives a denser, richer flavor.
- 1/3 cup granulated sugar — Sweetens the cream cheese base and balances the tang.
- 2 Tablespoons sour cream, at room temperature — Adds a subtle tang and keeps the filling smooth.
- 1 teaspoon lemon juice — Brightens the flavor and cuts some of the richness.
- 1/2 teaspoon pure vanilla extract — Rounds out the flavor with warm, comforting notes.
- Toppings & garnishes (your choice, such as fruit, chocolate sauce, or whipped cream) — Use fresh berries, chocolate drizzle, or extra whipped cream to finish each jar.
Step-by-Step Instructions
- Prepare your jars: Gather 6 clean 8-ounce jars or 10 clean 6-ounce jars and set them on a tray or work surface. Lining the tray with a towel helps keep jars steady while filling.
- Make the crust: Melt the unsalted butter in a heat-proof bowl. Add the graham cracker crumbs and stir until the mixture looks like wet sand. Spoon about 2 tablespoons of the crust mixture into each jar and press lightly with the back of a spoon to level. Press firmly but not so hard that the crust becomes too compacted.
- Whip the cream: In a large bowl, whip the cold heavy cream until stiff peaks form. Use chilled tools for best results and stop as soon as peaks hold to avoid overwhipping.
- Beat the cream cheese base: In a separate bowl, beat the softened cream cheese with sugar, sour cream, lemon juice, and vanilla extract until smooth and creamy. Scrape the sides of the bowl so there are no lumps.
- Fold in the whipped cream: Gently fold the whipped cream into the cream cheese mixture until fully combined. Fold slowly to keep the mixture light and airy.
- Layer the filling: Spoon a generous amount of the filling on top of the crust in each jar. Smooth the top or create a pretty swirl with a spoon.
- Chill: Refrigerate the jars for at least 30 minutes to let them set. For a firmer texture, chill for 2 to 4 hours.
- Serve with toppings: Just before serving, add your desired toppings and enjoy. For inspiration on combining cheesecake with other desserts, see this creative cheesecake bar idea featuring a swirl technique. Try a cheesecake swirl variation
Recipe Details
- Prep Time: 15 minutes
- Cook Time: 0 minutes
- Total Time: 45 minutes (includes chilling time)
- Servings: Makes 6 jars (8-ounce) or 10 jars (6-ounce), depending on jar size
- Calories: Approximately 420 kcal per 8-ounce jar, or about 250 kcal per 6-ounce jar
Tips, Storage & Variations
- Tips:
- Soften the cream cheese at room temperature for about 30 minutes for a lump-free filling.
- Chill your mixing bowl and beaters briefly before whipping cream to speed up the process.
- Use a small measuring cup or piping bag to fill jars neatly.
- Storage:
- Refrigerate covered jars for up to 3 days for best texture and freshness.
- To freeze, cover jars tightly and freeze for up to 1 month. Thaw in the refrigerator overnight before serving.
- Flavor variations using provided ingredients only:
- Fruit-topped jars: Add fresh fruit on top of the filling for brightness.
- Chocolate-drizzle jars: Finish with a chocolate sauce as your chosen topping for added richness.
- Extra whipped cream: Pipe additional whipped cream on top just before serving for a cloud-like finish.
For other cheesecake-style dessert ideas that pair well with these techniques, check out this carrot cake cheesecake recipe. Explore a carrot cake cheesecake Also see a rich carrot cake inspired cheesecake from a popular chain for flavor inspiration. Try a Cheesecake Factory carrot cake copycat
FAQ
- Can I make Cheesecake Jars ahead of time?
Yes. Assemble and chill them up to 3 days in the refrigerator, or freeze up to 1 month and thaw overnight in the fridge. - Do I need an electric mixer to whip the cream?
No, but an electric mixer makes it faster. You can hand-whip, but it will take longer to reach stiff peaks. - Can I use low-fat cream cheese or cream?
You can, but the texture will be less rich and may be slightly less stable than with full-fat ingredients. - How long should the jars chill before serving?
At least 30 minutes, though 2 to 4 hours gives a firmer set and better texture. - Can I prepare the crust directly in the jars ahead of time?
Yes, prepare the crust in the jars first, then keep them covered until you are ready to fill and chill. - What is the best way to prevent the crust from getting soggy?
Press the crust firmly and chill the jars before adding any juicy toppings to help the crust stay crisp.
People Also Ask
- How do you make a no-bake cheesecake filling light and airy?
Whip cold heavy cream to stiff peaks and gently fold it into the sweetened cream cheese base to retain air. - Can these jars be served at a picnic?
Yes, keep them chilled in a cooler and add toppings just before serving. - What size jars are best for individual servings?
Use 8-ounce jars for generous portions or 6-ounce jars for smaller servings. - Is lemon juice necessary in the filling?
Lemon juice adds brightness and balances the sweetness, but you can omit it if you prefer a milder flavor. - How can I speed up chilling time?
Place jars in the coldest part of the refrigerator and chill for at least 30 minutes; using an ice bath for the tray can help cool them faster before refrigerating. - Can I stack jars for transport?
Stacking is not recommended unless jars are sealed and packed to prevent tipping and crushing the topping. - Will the filling settle if I overmix?
Yes, overmixing can deflate whipped cream and result in a denser filling, so fold gently until incorporated.
Conclusion
These Cheesecake Jars are a simple, elegant dessert you can make in minutes and customize to your taste. For additional inspiration on jarred no-bake cheesecakes, check this detailed guide to no-bake jar cheesecakes from a popular baking blog: No-Bake Cheesecake Jars – Sally’s Baking Addiction. If you are curious about a warm, slow cooker approach to jarred cheesecakes, this slow cooker method offers a fun alternative: Slow Cooker Cheesecake in a Jar – Sprinkle Bakes. Try the recipe, personalize the toppings, and share your jars with friends for an easy crowd-pleaser.